How to write a Plugin
Files and directories:
- Description.txt (Mandatory)
- Plugin.cs (Mandatory)
- RouteProvider.cs
- DependencyRegistrar.cs
- web.config (Mandatory)
- /Content
- /Controllers
- /Localization
- /Models
- /Providers
- /Settings
- /Validators
- /Views
Description.txt
The file Description.txt is the configuration area of a plugin and contains all the metadata SmartStore.NET needs to handle the plugin. In this file, you can configure basic values such as FriendlyName, Author or the Version of the plugin.
  FriendlyName: MyPlugin
SystemName: MyCompany.MyPlugin
Group: Analytics
Version: 1.00
MinAppVersion: 2.1.1
Author: My Company
DisplayOrder: 1
FileName: MyCompany.MyPlugin.dll
ResourceRootKey: Plugins.MyCompany.MyPlugin
Configuration values
- FriendlyName: is the name of the plugin that will be displayed if the plugin hasn't yet been installed, hence the resource for the friendly name can't be displayed
- SystemName: Unique name to identify the plugin within the system
- Group: Name of the group in which the plugin should be displayed. Available group names are Admin, Marketing, Payment, Shipping, Tax, Analytics, CMS, Media, SEO, Data, Globalization, Api, Mobile, Social, Security, Developer, Sales, Design, and Misc
- Version: Version of the plugin
- MinAppVersion: Minimum SmartStore.NET version in which the plugin can be executed
- Author: Author name
- DisplayOrder: Order in which the plugin should be displayed
- FileName: Name of the dll. The convention for this name is Companyname.Pluginname (e.g. SmartStore.PayPal). The name you've defined here should also be defined in the project settings of your plugin Plugin Project > Properties > Application > Assemblyname, and it should be the standardnamespace Plugin Project > Properties > Application > Standardnamespace
- ResourceRootKey: Default resource key
- Url: The URL where the plugin can be obtained. If you're providing the plugin in the SmartStore Community Marketplace, you should place the Marketplace detail view of your plugin here. This way, the users of your plugin can visit it directly form the plugin management area of the backend of SmartStore.NET, and can stay updated or write comments regarding the plugin in the marketplace.
Build Output Path
Plugins in the SmartStore.NET solution don't reside within the application scope of the web application. The plugin projects are located in SmartStoreNET\src\Plugins . Therefore, they have to be built into the following directory:
..\..\Presentation\SmartStore.Web\Plugins\MyCompany.MyPlugin\
You must specify this directory in Plugin Project > Properties > Build > Output > Outputpath
Plugin.cs
Your Plugin class in Plugin.cs should implement BasePlugin , so it has to implement methods for Install and Uninstall where you have to perform all actions that have to be executed when your plugin gets installed or the action that need to be rolled back during uninstall. Typical actions are the initial creation of your plugin settings and the import of language resources.
Plugin settings
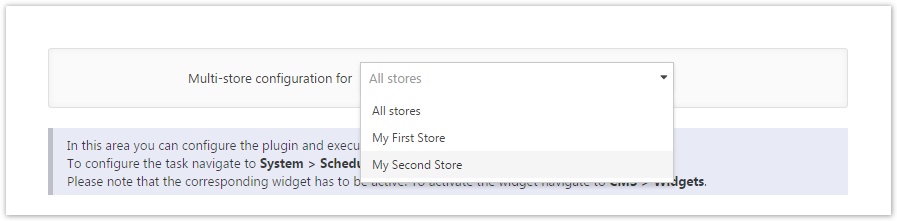
Your Plugin settings have to be derived from the ISettings class so that they can be saved and retrieved from the setting service of SmartStore.NET. Your setting class should contain all the values that the shop admin needs to configure your plugin. You can choose to provide either global settings for all configured stores in a multi-store environment or settings that can be set individually for a store. Therefore, you must implement the store scope configuration view.
@Html.Action("StoreScopeConfiguration", "Setting", new { area = "Admin" })
This will render the following control to your configuration view.
If you implement a configuration option where users have to enter a simple string, you can simply use SettingEditorFor in your configuration view.
@Html.SettingEditorFor(model => model.MyStringValue)
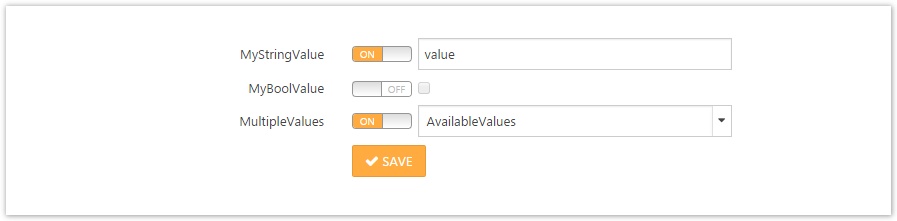
For other controls, you need to place the SettingOverrideCheckbox right before the control you're implementing.
@Html.SettingOverrideCheckbox(model => model.MyBoolValue)
@Html.CheckBoxFor(model => model.MyBoolValue)
or
@Html.SettingOverrideCheckbox(model => model.MultipleValues)
@Html.DropDownListFor(model => model.MultipleValues, Model.AvailableValues)
This will render your controls as they appear in the following screen, so that users can define if they want to override the settings for a certain store.
In the POST-ActionResult of the configuration view that will be launched when a user clicks the Save button, shop-dependent settings should be stored as follows:
        [HttpPost, AdminAuthorize, ChildActionOnly]
        public ActionResult Configure(ConfigurationModel model, FormCollection form)
        {
            if (!ModelState.IsValid)
                return Configure();
			ModelState.Clear();

			// get current setting
            var storeScope = this.GetActiveStoreScopeConfiguration(_storeService, _workContext);
            var myPluginSettings = _settingService.LoadSetting<MyPluginSettings>(storeScope);

			// update settings with new values of the configuration model
            myPluginSettings.MyStringValue = model.MyStringValue;
            myPluginSettings.MyBoolValue = model.MyBoolValue;
            myPluginSettings.MultipleValues = model.MultipleValues;

			// update settings
            var storeDependingSettingHelper = new StoreDependingSettingHelper(ViewData);
            storeDependingSettingHelper.UpdateSettings(myPluginSettings, form, storeScope, _settingService);

            _settingService.ClearCache();
            return Configure();
        }
Getting the shop-dependent settings in GET-ActionResult of the configuration view would appear as follows:
        [AdminAuthorize, ChildActionOnly]
        public ActionResult Configure()
        {
            var storeScope = this.GetActiveStoreScopeConfiguration(_storeService, _workContext);
            var myPluginSettings = _settingService.LoadSetting<MyPluginSettings>(storeScope);

            var model = new ConfigurationModel();
            var storeDependingSettingHelper = new StoreDependingSettingHelper(ViewData);
            storeDependingSettingHelper.GetOverrideKeys(myPluginSettings, model, storeScope, _settingService);

            model.MyStringValue = myPluginSettings.MyStringValue;
            model.MyBoolValue = myPluginSettings.MyBoolValue;
            model.MultipleValues = myPluginSettings.MultipleValues;

            // setting up the model to display available values for the combobox
            model.AvailableValues = new List<SelectListItem>();
            model.AvailableValues.Add(new SelectListItem { Text = "Option1", Value = "1" });
            model.AvailableValues.Add(new SelectListItem { Text = "Option2", Value = "2" });
            model.AvailableValues.Add(new SelectListItem { Text = "Option3", Value = "3" });

            return View(model);
        }
Resources
Resources should be stored in the \Localization directory as xml files with the convention resources.{lang}.xml, where {lang} represents the ISO culture code for the desired language, e.g. en-US. You can add as many languages as you want.
Import the resources during the installation of the plugin with the following code
_localizationService.ImportPluginResourcesFromXml(this.PluginDescriptor);
and delete them during uninstall with
_localizationService.DeleteLocaleStringResources(PluginDescriptor.ResourceRootKey);
You can add the required resources either as direct child nodes of the Language node or as child nodes of another LocalResource node. For a LocalResource node, you can specify the attributes Name and AppenRootKey, which is true by default. The Name attribute defines a unique key of the resource with which you can obtain the resource in your views. The AppendRootKey defines whether the ResourceRootKey, which you have defined in the desciption.txt of your plugin, should be prepended to the Name. If your resources are child nodes of another LocaleResource node, the name will be appended to the name of the parent resource name.
The content of your xml file looks like this.
<Language Name="English" IsDefault="false" IsRightToLeft="false">
  <LocaleResource Name="Plugins.Payments.MyPlugin" AppendRootKey="false">
    <Children>
      <LocaleResource Name="ConfigSaveNote">
        <Value>Your settings were successfully saved.</Value>
      </LocaleResource>
		...
The setting above can be obtained with the key Plugins.Payments.MyPlugin.ConfigSaveNote. In a view, you can display the resource with @T("Plugins.Payments.MyPlugin.ConfigSaveNote").
Providers
Providers should be implemented if there is more than one plugin with the same base. Payment methods are a good example of this. Often, you need to implement nearly the same functionality for every payment plugin twice, because there are other parameters required for different methods of the same payment gateway.
Your provider should implement one of the following base classes or interfaces depending on the functionality of your plugin.
- PaymentMethodBase
- IShippingRateComputationMethod
- ITaxProvider
- IExternalAuthenticationMethod
- DiscountRequirementRuleBase
- IWidget
If your plugin needs to be configured, it has to inherit the setup from IConfigurable and implement the method GetConfigurationRoute, where you specify the configuration route for the plugin.
Tip
If you don't need providers you can implement the interfaces above also within your plugin.
Content
Within the /Content directory, you should place any content you need within your plugin (e.g. css-files, javascript-files, images).
/Content/icon.png
The icon.png will be shown within the admin area, where the plugins are being configured by the shop administrator.
/Views
In the Views directory, you place all the views you need for your plugin. (e.g. the configuration view or the view that will be rendered in the public shop)
Packaging
To package a plugin so that it can be installed by SmartStore.NET, open the SmartStore Packager src\Tools\SmartStore.Packager\bin\Debug\SmartStore.Packager.exe
The root path is your SmartStore.Web project which contains your plugin. After entering this path, you can read the extensions that are included within. Then, you just need to choose your plugin and an output path and click on Create package